Showing posts with label google map. Show all posts

October 30, 2017

Adding google map to Java Server Page to show the location of your business

Adding google map with markers in to website

<%@ page language="java" contentType="text/html; charset=ISO-8859-1"
    pageEncoding="ISO-8859-1"%>
<!DOCTYPE html PUBLIC "-//W3C//DTD HTML 4.01 Transitional//EN" "http://www.w3.org/TR/html4/loose.dtd">
<head>
        <title>Branch Details</title>
        <meta http-equiv="Content-Type" content="text/html; charset=utf-8"/>
        <link rel="stylesheet" type="text/css" href="../CSS/branchForm.css"/>
        <link href="CSS/jquery-ui.css" rel="stylesheet">
        <script type="text/javascript" src="JS/jquery.ui.datepicker.js"></script>
        <script src="https://maps.googleapis.com/maps/api/js?callback=initMap" async defer></script>
        <link href="CSS/style.css" rel="stylesheet">
     
  <script>
  $(function() {
    $( "#datepicker" ).datepicker();
  });
  </script>

    </head>
    <body> 
        <form action="" class="register">
        <!--
            <h1>Branch Registration</h1>
            <fieldset class="row1">
                <legend>Account Details
                </legend>
                <p>
                    <label>Category
                    </label>
                    <input type="text"/>
                    <label>Firm Code
                    </label>
                    <input type="text"/>
                </p>
                <p>
                    <label>Name
                    </label>
                    <input type="text"/>
                    <label>Constituency
                    </label>
                    <input type="text"/>
                    <label class="obinfo">* mandatory fields
                    </label>
                </p>
            </fieldset>
             -->
            <fieldset class="row2">
           
                <legend>Branch Details
                </legend>
             
                <p>
                    <label>Name
                    </label>
                    <input type="text"/>
                </p>
             
                <p>
                    <label>Firm Code
                    </label>
                    <input type="text"/>
                </p>
             
                <p>
                    <label>Category
                    </label>
                    <input type="text"/>
                </p>
           
             
                <p>
                    <label>Constituency
                    </label>
                    <input type="text"/>
               
                </p>
             
                <p>
                    <label>Address *
                    </label>
                    <input type="text" class="long"/>
                </p>
                <p>
                    <label>Location *
                    </label>
                    <input type="text" id="pac-Input" placeholder ="Enter your location"  />
                </p>

                <p>
                    <label>City *
                    </label>
                    <input type="text" class="long" id="cityTxt"/>
                </p>
                <!--
                <p>
                    <label>Country *
                    </label>
                    <select>
                        <option>
                        </option>
                        <option value="1">United States
                        </option>
                    </select>
                </p>
                -->
                <p>
                    <label>Inauguration Date *
                    </label>
                    <input type="text" maxlength="10" id="datepicker"/>
                </p>
                 <p>
                    <label>Lat *
                    </label>
                    <input type="text" maxlength="2" id="latBox" />
                    </p>
                    <p>
                    <label>Lon *
                    </label>
                    <input type="text" maxlength="2" id="lngBox" />
                </p>
             
                <p>
                    <label class="optional">Website
                    </label>
                    <input class="long" type="text" value="http://"/>

                </p>
            </fieldset>
            <fieldset class="row3">
                <legend>Branch Location
                </legend>
                <!--
                <p>
                    <label>Gender *</label>
                    <input type="radio" value="radio"/>
                    <label class="gender">Male</label>
                    <input type="radio" value="radio"/>
                    <label class="gender">Female</label>
                </p>
             
                -->
                  <!--
                <p>
                    <label>Inaugration date
                    </label>
                    <select class="date">
                        <option value="1">01
                        </option>
                        <option value="2">02
                        </option>
                        <option value="3">03
                        </option>
                        <option value="4">04
                        </option>
                        <option value="5">05
                        </option>
                        <option value="6">06
                        </option>
                        <option value="7">07
                        </option>
                        <option value="8">08
                        </option>
                        <option value="9">09
                        </option>
                        <option value="10">10
                        </option>
                        <option value="11">11
                        </option>
                        <option value="12">12
                        </option>
                        <option value="13">13
                        </option>
                        <option value="14">14
                        </option>
                        <option value="15">15
                        </option>
                        <option value="16">16
                        </option>
                        <option value="17">17
                        </option>
                        <option value="18">18
                        </option>
                        <option value="19">19
                        </option>
                        <option value="20">20
                        </option>
                        <option value="21">21
                        </option>
                        <option value="22">22
                        </option>
                        <option value="23">23
                        </option>
                        <option value="24">24
                        </option>
                        <option value="25">25
                        </option>
                        <option value="26">26
                        </option>
                        <option value="27">27
                        </option>
                        <option value="28">28
                        </option>
                        <option value="29">29
                        </option>
                        <option value="30">30
                        </option>
                        <option value="31">31
                        </option>
                    </select>
                    <select>
                        <option value="1">January
                        </option>
                        <option value="2">February
                        </option>
                        <option value="3">March
                        </option>
                        <option value="4">April
                        </option>
                        <option value="5">May
                        </option>
                        <option value="6">June
                        </option>
                        <option value="7">July
                        </option>
                        <option value="8">August
                        </option>
                        <option value="9">September
                        </option>
                        <option value="10">October
                        </option>
                        <option value="11">November
                        </option>
                        <option value="12">December
                        </option>
                    </select>
                 
                    <input class="year" type="text" size="4" maxlength="4"/>e.g 1976
                </p>
             
           
                <p>
                    <label>Nationality *
                    </label>
                    <select>
                        <option value="0">
                        </option>
                        <option value="1">United States
                        </option>
                    </select>
                </p>
               
                <p>
                    <label>Children *
                    </label>
                    <input type="checkbox" value="" />
                </p>
             
                <img src="../IMAGES/googleMap.jpg" style="width:398px;height:209px;">
                -->
                <div id="map"></div>
    <script>
      function initMap() {
        var mapDiv = document.getElementById('map');
       
        var map = new google.maps.Map(mapDiv, {
          center: {lat: 11.253069, lng: 75.78281},
          zoom: 12
        });
       
        var marker = new google.maps.Marker({
        position: {lat: 11.253069, lng: 75.78281},
        map: map,
        title: 'Triveni location',
        draggable: true
          });
       
        var locationInput = document.getElementById('pac-Input');
       
        google.maps.event.addListener(marker, 'dragend', function (event) {
        document.getElementById("latBox").value = this.getPosition().lat();
        document.getElementById("lngBox").value = this.getPosition().lng();
        //document.getElementById("cityTxt").value = locationInput;
        });
       
        var autocomplete = new google.maps.places.Autocomplete(locationInput);
        autocomplete.bindTo('bounds', map);
       
        var infowindow = new google.maps.InfoWindow();
       
          autocomplete.addListener('place_changed', function() {
          alert(" autocomplete add listener ");
         
            infowindow.close();
            //marker.setVisible(false);
            var place = autocomplete.getPlace();
            if (!place.geometry) {
              window.alert("Autocomplete's returned place contains no geometry");
              return;
            }
         
        var address = '';
            if (place.address_components) {
              address = [
                (place.address_components[0] && place.address_components[0].short_name || ''),
                (place.address_components[1] && place.address_components[1].short_name || ''),
                (place.address_components[2] && place.address_components[2].short_name || '')
              ].join(' ');
            }

            infowindow.setContent('<div><strong>' + place.name + '</strong><br>' + address);
            infowindow.open(map, marker);
         
        });
       
       
          //});
        /*
        var input = document.getElementById('pacInput');
          var searchBox = new google.maps.places.SearchBox(input);
          map.controls[google.maps.ControlPosition.TOP_LEFT].push(input);
         
          searchBox.addListener('places_changed', function() {
            var places = searchBox.getPlaces();

            if (places.length == 0) {
              return;
            }
        */
       
      }
    </script>
   
                <!--
                <div class="infobox"><h4>Helpful Information</h4>
                    <p>Here comes some explaining text, sed ut perspiciatis unde omnis iste natus error sit voluptatem accusantium doloremque laudantium, totam rem aperiam, eaque ipsa quae ab illo inventore veritatis et quasi architecto beatae vitae dicta sunt explicabo.</p>
                </div>
                -->
            </fieldset>
            <fieldset class="row4">
                <legend> blah blah blah...
                </legend>
                <p class="agreement">
                    <input type="checkbox" value=""/>
                    <label>*  Is the <a href="#">unit currently working</a></label>
                </p>
                <!--
                <p class="agreement">
                    <input type="checkbox" value=""/>
                    <label>I want to receive personalized offers by your site</label>
                </p>
                <p class="agreement">
                    <input type="checkbox" value=""/>
                    <label>Allow partners to send me personalized offers and related services</label>
                </p>
                -->
            </fieldset>
            <div><button class="button">Register &raquo;</button></div>
        </form>
    </body>
</html>


How to enable database cache in my java application

https://stackoverflow.com/questions/47004240/how-to-enable-database-cache-in-my-java-application


December 28, 2016

Attendance Tracking System Consumerfed kozhikode it section


Online Attendance Monitoring System IT Section


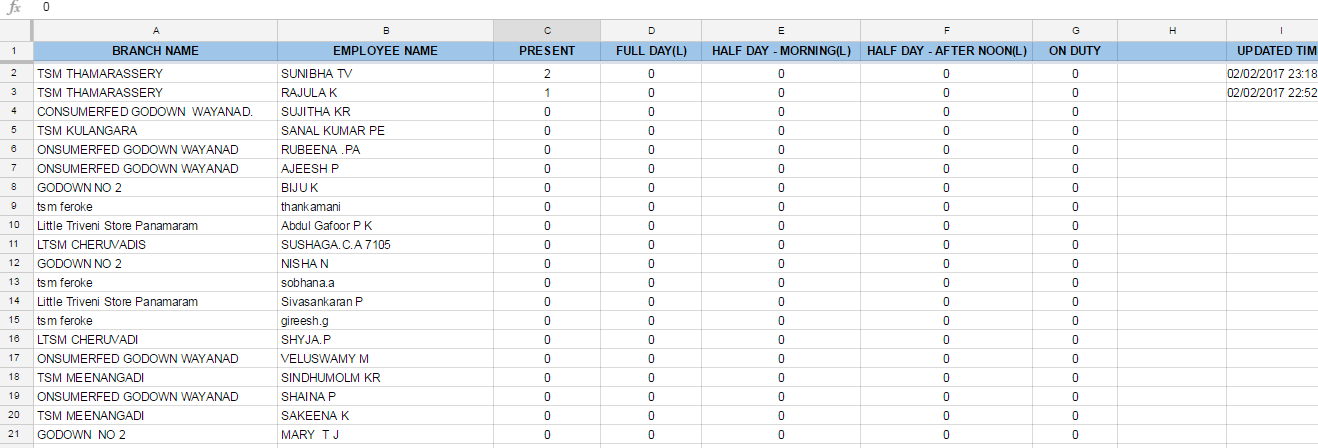
          Created a robust G suite application for consumerfed regional office kozhikode (attendance monitoring system), which helps multiple users can mark their attendance simultaneously through a google form. The form is linked with a google spreadsheet where all the responses are saved which can be viewed in real time. The google spreadsheet is designed in such a way that the monitoring users can only view present day report. The attendance is mailed daily both as html and pdf format. Once in every month the google script will automatically back up the spreadsheet in google drive.

         The Google form and spreadsheet works only on javascript enabled web browsers.

         Maximum number of rows allowed is approximately 4 lakhs and the 250 sheets on google spreadsheet. Maximum of 15GB space is allowed in google drive.

contact number : 8281 8080 29, mail us

Please send your feedback to consfedkozhikode@gmail.com


History

The project was initially developed in 2015 November for Regional office kozhikode Regional Manager then new features was added in 2016 September and application was very much active during that period, New features like consolidation, tracking, automatic error tracking etc were included.

Consumerfed I T Section

Google Form


A Google Form is a tool from google that allow you to collect the information in an easy way to a google spreadsheet

Tutorial

Google Form - UI through which end users enter the data

link to google form


Google Spreadsheet


Each and every information entered by employees is kept in spreadsheet , but the view is restricted to that day. Downloading the sheet helps you view all the data from starting

Tutorial


GOOGLE SPREADSHEETS
link to google spreadsheet


Google Script - Script Editor


GOOGLE SCRIPT CODE

How script Editor works


Go To Tools >> Script Editor in google spread sheet.

Select any function then click on run command. For example if you want to send an email with pdf, go to script editor, choose the function mailLeaveDetails() from the combo box, then click on run command. An email will be send to the mail described in the controller spreadsheet

SCRIPT EDITOR

Google script failure alert


E mail while script error

Google controller Spreadsheet


Google controller spread sheet act as a property value sheet where the admin can control all the attendance works like e mail address to which the mail should be send, the subject of the email, the footer etc. He can also stop the mail sending by giving property value as NO.

CONTROLLER SPREADSHEET
link to controller spreadsheet


Flow chart (context level)


DATA FLOW

Backup in google drive


Backup of spreadsheet is done automatically on first day of the month in office google drive.


BACKUP IN GOOGLE DRIVE

Emailing attendance information directly on google form submit


E-mail template for attendance


Smart monitoring of Cfed Attendance


Monitoring the attendance application using a third party smart apps let us know when the server is down and how long the server being down. Help us to identify the fake complaints

Cfed Attendance

Email information regarding the up and down time of attendance application


E mail while attendance apps is down

Google Spreadsheet attendance tracking system


Attendance Reporting google sheet

link to sheet


Automatic consolidation spreadsheet

         
           Google consolidation sheet will consolidate the entered attendance details automatically

Consolidation sheet

Link to google spreadsheet


Sample consolidation excel sheet


Automatic deletion of duplicate entries

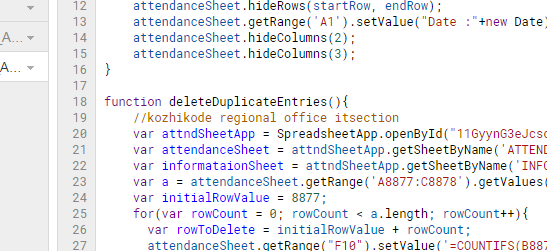
         There is a script running on the background of the sheet that will track the duplicate entries on the particular day and automatically delete the first entered value. A separate sheet 'INFORMATIONS' is kept , where all details regarding such automatic operation summaries is kept.


Google script sample

Graphical representation of Attendance Status


Pie chart showing attendance percentage in our region

Pie chart showing branch attendance status


Pie chart showing employees attendance status


Download file here


Message Me Here


E-mail templates

List of employees who fails to mark attendance on the day


E mail to IT head informing the employees who fails to mark the attendances on that day

Employee list who forget to mark attendances

Daily consolidation E mail


Sending attendance status daily consolidated email to IT Head

email template
E mail Template


Direct Email


E mail directly to office mail who mark attendance after noon

E mail templates
Automatic update details

Attendance consolidation for salary 


sample consolidation report
link to video


Email Report to users


Attendance form created by Regional Office Kozhikode IT Section. +Consumerfed IT Division


☺☺☺☺☺☺☺☺☺☺☺☺☺☺☺

CONSUMERFED KOZHIKODE WEBSITE

Issues and solutions


Download documentation

Kerala State Rule Leave Details

Thanks to +rasmi pramod , +Shimjith Kumar , +Vipin Cp for their valuable supports

Thanks to IT section Head office for Assigning this project

Today's Attendance Status


Google App Script Complete Tutorial

http://javabelazy.blogspot.in/

June 05, 2014

Multiple Marker on Google Map

Google Map to view multiple marker example


Description :How to add google map to your java application: To view multiple markers on same google map. while clicking on the marker, the details of that branch will be shown in a separate div. The website can be useful for large business firms to show their branches. The first 3 line of code is of java spring ( No need of it for google map). Here we use simple google map marker instead of complex one.

the css for the html page is shown below (javasourcecode.css)

You can see a combo box on the google map, currently that feature won t work, working code for that will be updated shortly. The location details can be added through json object, using jquery and ajax will smooth-en your code.

Java Google Map multiple marker apps
Google map with multiple marker

jquery google map maker in java web application


<%@taglib uri="http://www.springframework.org/tags" prefix="spring"%>
<%@taglib uri="http://www.springframework.org/tags/form" prefix="form"%>
<%@taglib uri="http://java.sun.com/jsp/jstl/core" prefix="c"%>

<%@ page language="java" contentType="text/html; charset=ISO-8859-1"
    pageEncoding="ISO-8859-1"%>
<!DOCTYPE html PUBLIC "-//W3C//DTD HTML 4.01 Transitional//EN" "http://www.w3.org/TR/html4/loose.dtd">
<html>
  <head>
    <meta name="viewport" content="initial-scale=1.0, user-scalable=no">
    <meta charset="utf-8">
    <title> Who will be the winner of football world cup 2014 </title>
      <link href="css/javasourcecode.css" rel="stylesheet" type="text/css" />

  <script src="http://maps.google.com/maps/api/js?sensor=false"></script>
  <script src="http://ajax.aspnetcdn.com/ajax/jQuery/jquery-1.10.1.min.js"></script>
  <script type="text/javascript" src="js/units.js"></script>
<script>


function initialize() {
  var mapOptions = {
    zoom: 11,
    center: new google.maps.LatLng(1.319154,5.918564)
  }
  var map = new google.maps.Map(document.getElementById('map-canvas'),
                                mapOptions);

  setMarkers(map, beaches);
}
var infowindow = new google.maps.InfoWindow({
    maxWidth: 160
  });
// get javascript object here pass it to beach
//var triveniUnits = getUnits();
//alert(' Winner : '+triveniUnits.length);
var beaches = [
  ['Brazil', 1.253069,5.78281,'images/worldcup.png',4],
  ['Argentina', 1.291158,75.74415,'images/worldcup.png',5],
  ['Belgium', 1.273474,5.774783,'images/worldcup.png',3],
  ['Spain', 1.294241,5.815177,'images/worldcup.png',2],
  ['England ', 1.305014,5.876385,'images/worldcup.png',1]
];

function setMarkers(map, locations) {
  var markers = new Array();
  var marker;
  for (var i = 0; i < locations.length; i++) {
    var beach = locations[i];
    var myLatLng = new google.maps.LatLng(beach[1], beach[2]);
        marker = new google.maps.Marker({
        position: myLatLng,
        map: map,
title: beach[0],
        //zIndex: beach[3]
    });
        markers.push(marker);
     
google.maps.event.addListener(marker, 'click', (function(marker, i) {
            return function() {
            //var infoWinwhtml = '<div id="infowindow" style="width:320px; height:200px;" ><H4>'+locations[i][0]+'</H4></br><p><img src="'+locations[i][3]+'" alt="World cup football 2014"></p></div>';
             //infowindow.setContent(locations[i][0]);
             var infoWinwhtml = '<div id="infowindow"><H4>'+locations[i][0]+'</H4></div>';
             infowindow.setContent(infoWinwhtml);
             var infoHtml = '<div  class="triveniInfo"><H4>'+locations[i][0]+'</H4></br><p><img src="'+locations[i][3]+'" alt="Triveni Image"><h6> Distance : 200km </h6></p></div>';
              marker.setAnimation(google.maps.Animation.BOUNCE);
              infowindow.open(map, marker);
              var sidediv = document.getElementById('content-window');
              sidediv.innerHTML = infoHtml;
            }
          })(marker, i));
  }
}

google.maps.event.addDomListener(window, 'load', initialize);

    </script>
  </head>
  <body>
  <div id="headerId" class="header">
<div id="logo" class="logos"><img src="images/worldcupLogo.jpg" alt="cfed Logo"></div>
<h1> How to integrate Google map features in java spring source code</h1>
<div id="menuTabsId" class="menuTabs"><a href="worldcupEvents.html"> event</a><a href="worldcupmap.html"> view map </a></div>

</div>
  <div id="panel">
  <b>Select: </b>
    <select id="worldcup football" onchange="calcRoute();">
      <option value="worldcup">Belgium</option>
      <option value="st louis, mo">Germany</option>
      <option value="joplin, mo">Spain</option>
      <option value="oklahoma city, ok">England</option>
      <option value="amarillo, tx">Brazil</option>
</select>
  </div>
    <div id="map-canvas" style="width:80%; height:80%; float:left"></div>
    <div id="content-window" style="width:20%; height:80%; float:left"></div>

  <div id="footerId" class="footer">
http://nikzblog/</div>
  </body>
</html>

javasourcecode.css


/*External Cascading style sheet for the above html code*/


/* Google map css */

html, body, #map-canvas {
        height: 100%;
        margin: 0px;
        padding: 0px
}

#panel {
        position: absolute;
        top: 120px;
        left: 20%;
        margin-left: -180px;
        z-index: 5;
        background-color: #fff;
        padding: 5px;
        border: 1px solid #999;
}


/* Developed by shimjith kumar */
+Shimjith Kumar 

.logos{
    float: left;
}

.header{
    height:100px; 
    background-color: #EEEEEE;
}

.header h1{
    margin-bottom: 0;
    text-align: center;
}

.footer{
      background-color: #FFA500;
    height: 2%;
    clear: both;
    text-align: center;
}


.menuTabs{
    position:relative;
    top:0px;
    width:80px;
    height:20px;
    float:right;  
}


/*  external css design in java application */
.triveniInfo h4{
    text-align: center;
}
.triveniInfo p{
    text-align: center;
}

/* google map info window css design */
#infowindow h4{
    text-align: center;
}
#infowindow p{
    text-align: center;
}

Thanks for reading the code, Please provide your feedback through comments

author : +Shimjith


http://javabelazy.blogspot.in/

March 07, 2014

Online Hardware Register - Consumerfed Regional office kozhikode

Online Hardware Register for IT Section Consumerfed

Created using G suites


Created an online hardware register using G suite apps, Link to this spreadsheet is given below. The accessories transferred details has to be inputted in spreadsheet supplies where the consolidation is automatically carried out in invoice sheet. Try it out !

Transfer of accessories details

Automatic report generating


Calculating reports automatically using queries


Link to spreadsheet


Call us @ 82 81 80 80 25/29


http://javabelazy.blogspot.in/

Facebook comments